

For shower floors specifically, the herringbone layout is particularly practical because the diagonal orientation of the joints helps direct water toward the drain more naturally than a straight-set pattern. Use mosaic-format herringbone panels — often sold on mesh backing in 1×3 or 2×4 inch pieces — for shower floors, and consider scaling up to 3×12 or 4×12 on shower walls for visual contrast without overwhelming the space.
Idea 2: Wood-Look Porcelain Herringbone for the Kitchen
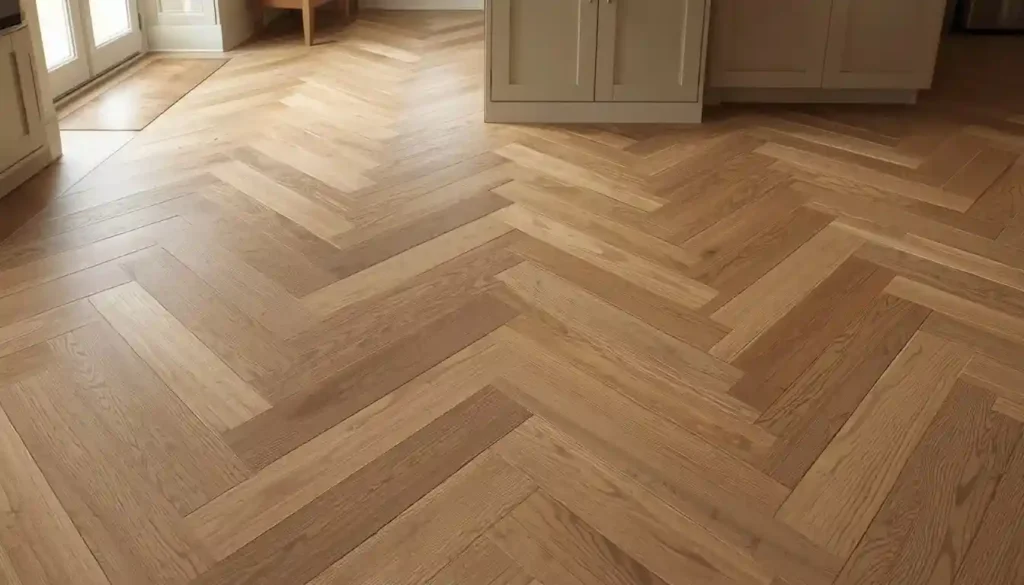
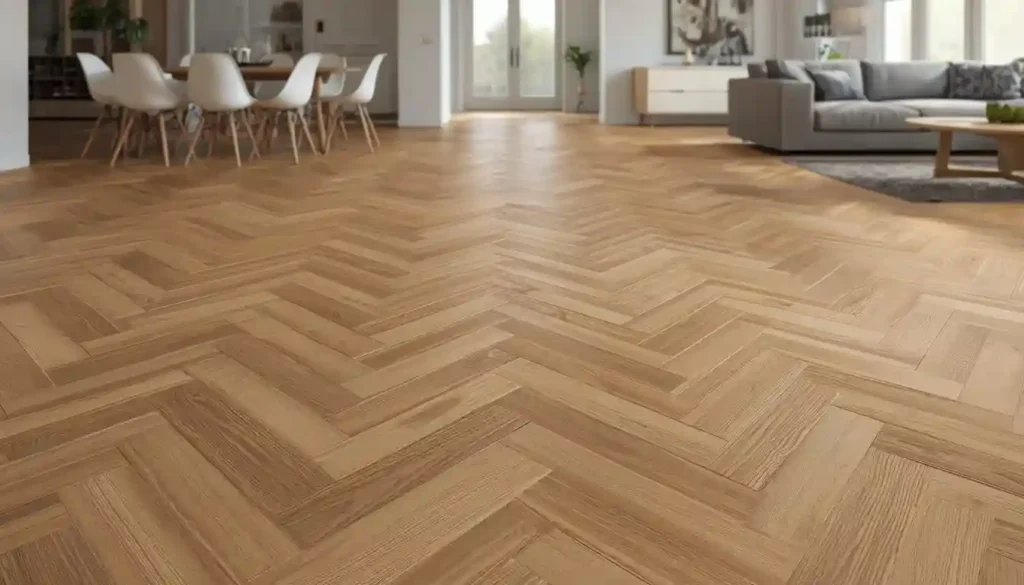
The combination of a wood-look porcelain tile laid in a herringbone pattern is the single most influential kitchen floor trend of this decade, and it is not hard to understand why. It delivers the warmth and texture of natural oak or walnut flooring with the water resistance, stain resistance, and durability of fired porcelain — a material that does not buckle when the dishwasher leaks or warp in humid conditions. For busy kitchens where spills are a daily reality, this combination resolves one of the longest-standing tensions in interior design: the conflict between wanting natural materials and needing practical ones.
The tile size is critical here. Narrow, elongated planks — 6×24 or 6×36 inches — are the right choice for this look. The longer the plank, the more convincingly the pattern reads as natural parquet flooring from a distance, which is exactly the effect most homeowners are after. In a galley kitchen, laying the herringbone so the V points toward the far end of the room draws the eye down the length of the space, making a narrow kitchen feel longer and more intentional. In an island kitchen, centering the pattern on the island itself and running it out toward the walls creates a visual anchor that organizes the entire room.
Medium-toned wood looks — warm ash, natural oak, grey-washed timber — perform best here because they show neither every crumb nor every streak of mopping water. A floor that looks immaculate immediately after cleaning but shows every subsequent footprint creates daily frustration. A warm mid-tone in a matte or low-sheen finish hides that reality gracefully. Pair with white shaker cabinets and the contrast between the linear cabinet fronts and the diagonal floor pattern creates exactly the kind of productive tension that makes a kitchen interesting to be in.
Idea 3: Black Herringbone Tile for a Dramatic Entryway
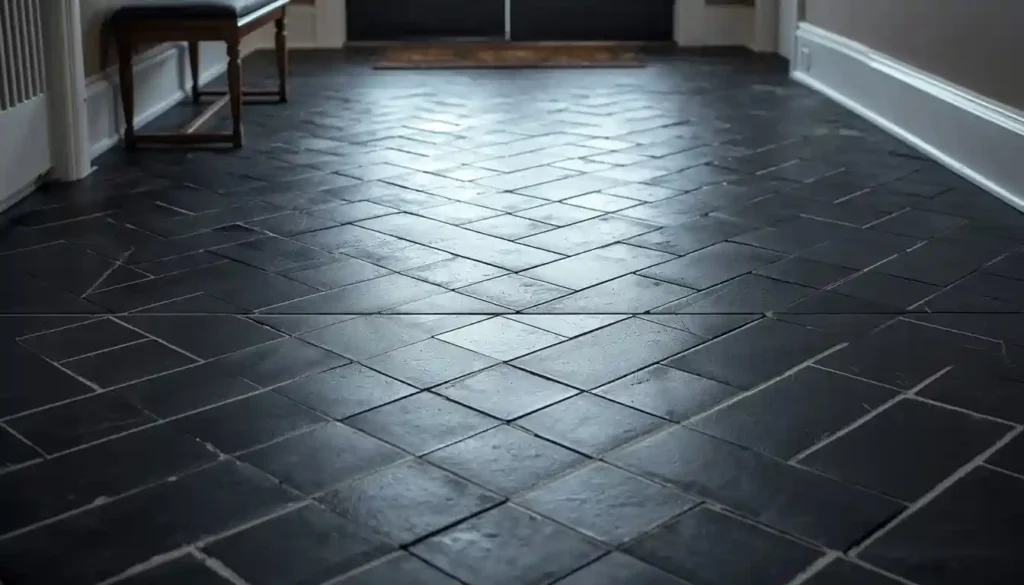
Entry halls are the one space in a home where you can be genuinely bold with flooring without worrying about it feeling oppressive — because people move through rather than linger. A black herringbone tile floor in an entryway makes an immediate statement, signals intentionality throughout the home, and has an architectural quality that no other layout can match. The pattern draws the eye from the front door forward, creating momentum and directing movement down the hall. In a narrow entrance, that directional energy actually works in the space’s favor by making it feel purposeful rather than confined.
Matte black or charcoal porcelain performs better here than glossy black, which will show every scuff mark and footprint. The herringbone layout in a darker tile benefits enormously from contrasting grout — white or pale grey — because the light-colored joints make the geometric pattern pop against the dark tile surface. Without contrast, the pattern can become hard to read in lower light conditions, and much of the visual drama is lost. The combination of black tile with white grout is essentially a graphic floor pattern, bold enough to work alongside simple white walls and stripped-back furniture without needing much else in the room.
Smaller tiles — 2×4 or 3×6 — work particularly well in entryways because the denser pattern of joints feels decorative and crafted in a way that a large-format herringbone does not. Think of it as the tile equivalent of detailed carpentry: more pieces, more joints, more evidence of considered installation. If the entry hall transitions to other flooring, this is also where choosing the right transition strip becomes important for maintaining a clean visual boundary between the bold herringbone and whatever material continues into the adjacent room.
Idea 4: Terracotta Herringbone for a Warm, Mediterranean Kitchen
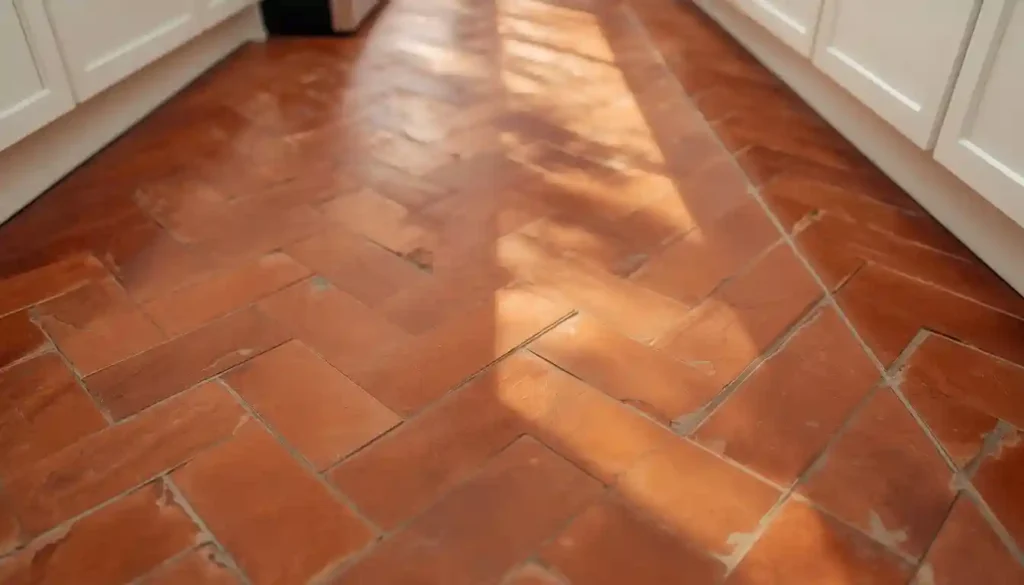
Terracotta tiles in a herringbone pattern are having a genuine resurgence, and the context is Southern California homes specifically, where warm earthen tones, textured surfaces, and references to Spanish and Mediterranean architecture have always had deep roots. Real terracotta is made from unglazed fired clay and has a warm, handmade quality — slight variation in color and texture from tile to tile — that no two tiles in a batch will look exactly the same. That variation is not a flaw; it is the material’s most valuable characteristic. Laid in herringbone, those individual differences compound across the floor into something that looks like it belongs in a 400-year-old farmhouse and a renovated modern kitchen simultaneously.
Terracotta-effect porcelain tiles capture the same earthy warmth with considerably less maintenance overhead. Real terracotta must be sealed before installation, after grouting, and then periodically throughout its life to prevent staining. Porcelain that mimics terracotta’s color and texture needs none of that — it handles kitchen spills, oils, and foot traffic without special treatment. For most homeowners in practical terms, the porcelain version is the more sensible choice without compromising any of the visual warmth.
In a kitchen with white or cream painted cabinets, a terracotta herringbone floor creates a counterpoint that feels layered and evolved rather than matched and coordinated. Add exposed timber shelving, unlacquered brass hardware, and rough-textured linen textiles, and the room develops a collected-over-time quality that is extremely difficult to achieve with less characterful flooring materials. The grout should lean warm — a sandy or buff tone — to complement the earthen tile rather than fighting it with a cool grey.
Idea 5: Large-Format Grey Porcelain Herringbone in the Living Room
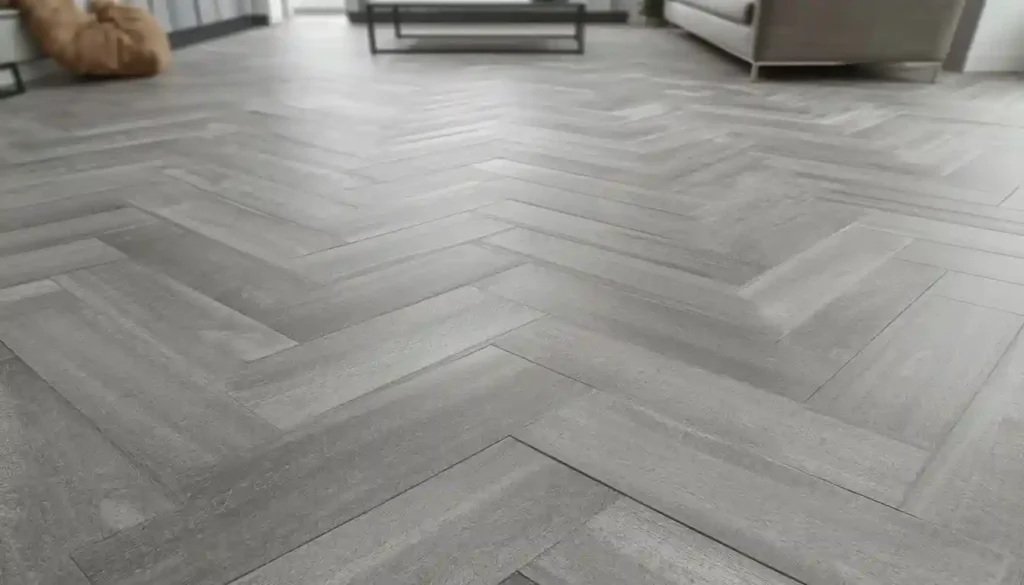
One of the more recent shifts in herringbone tile design is the move toward larger tile formats. While the pattern has historically been associated with smaller, narrow tiles, contemporary installations using planks of 4×24 or 6×36 inches produce something with a completely different visual character — architectural, bold, and quietly sophisticated. In an open-plan living room where the floor needs to carry a large area without becoming visually overwhelming, large-format grey porcelain herringbone manages that balance extremely well.
Grey is the neutral choice here for good reason: it does not compete with furniture, it reads as clean and resolved, and it bridges the gap between cool-toned modern spaces and warmer, more layered ones depending on whether you choose a blue-grey or a brown-grey. A concrete-effect porcelain in a large herringbone format gives living room floors a quality that is simultaneously understated and genuinely interesting — it avoids the visual blankness of a plain large-format tile while not screaming for attention the way a patterned tile might.
In rooms this size, the direction of the herringbone matters. Running the V toward the main window or the focal point of the room — a fireplace, a feature wall, a view — uses the pattern’s directional quality purposefully. The floor becomes a gentle visual guide rather than a static surface. Match grout to tile color for a monolithic look that reads more as one continuous textured plane than a pattern of individual tiles, which can be preferable in large spaces where you want the room’s architecture and furnishings to take visual priority.
This approach to flooring shares some of the same design logic as choosing between tile and laminate for a living area — both offer durable, pattern-capable floors, but tile’s permanence and texture variety give it an edge in formal living spaces.
Idea 6: Sage Green Ceramic Herringbone for the Bathroom Wall
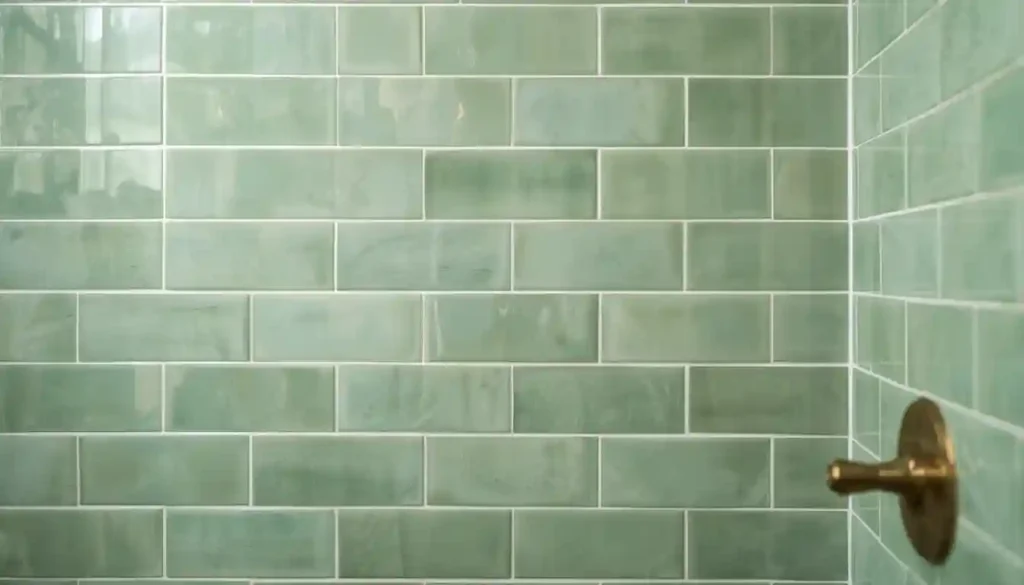
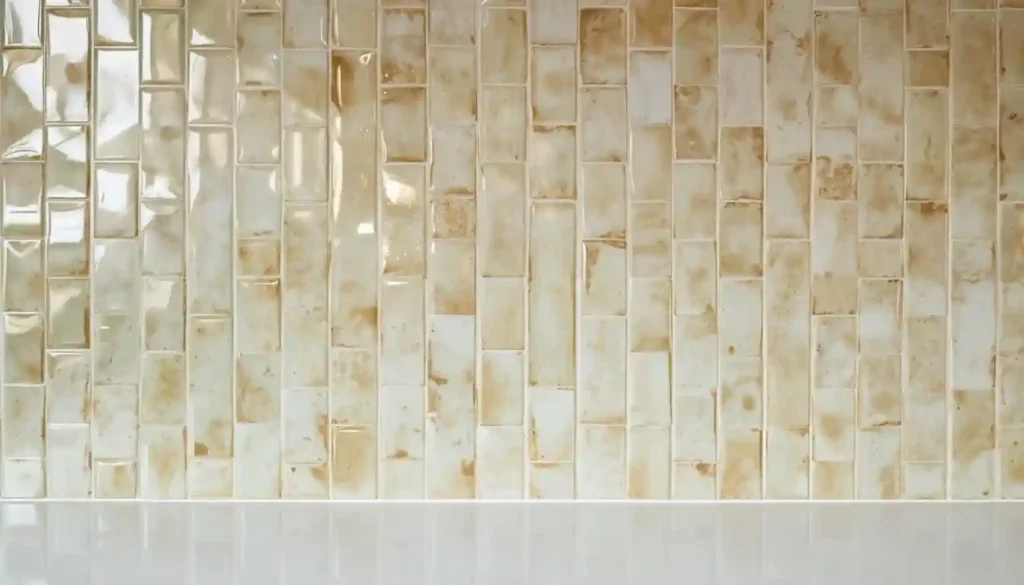
Herringbone is not only a floor pattern. Used on bathroom walls — particularly in showers, behind vanities, or as a full wet-wall treatment — it transforms a utilitarian surface into a decorative feature. Green is one of the most significant tile color trends of recent years, and sage green specifically occupies a particularly desirable middle ground: it is warm enough to feel inviting, muted enough to avoid becoming a statement that ages badly, and earthy enough to reference natural materials without literally replicating them.
In ceramic, which is the appropriate material for walls since it does not need to withstand foot traffic, the surface can carry gloss or semi-gloss finishes without the slip-risk concerns of a floor tile. A glazed sage green ceramic in a 2×6 or 3×9 herringbone on a shower wall catches light at multiple angles across the course of a day in a way that flat tiles simply cannot. The slight variation in the glaze from tile to tile — especially in handmade-style ceramics — amplifies this. The pattern also creates a visual texture that makes the wall feel present and considered even without any other decorative elements.
Pair a sage green herringbone wet wall with warm white paint on adjoining walls and simple brass or unlacquered bronze fixtures. Keep the floor restrained — a plain off-white or warm grey tile in a simple format — so the wall becomes the clear focal point. In a compact bathroom especially, one strong decision executed well is almost always preferable to many competing ideas fighting for attention across different surfaces.
Idea 7: Natural Stone Herringbone for a Hallway
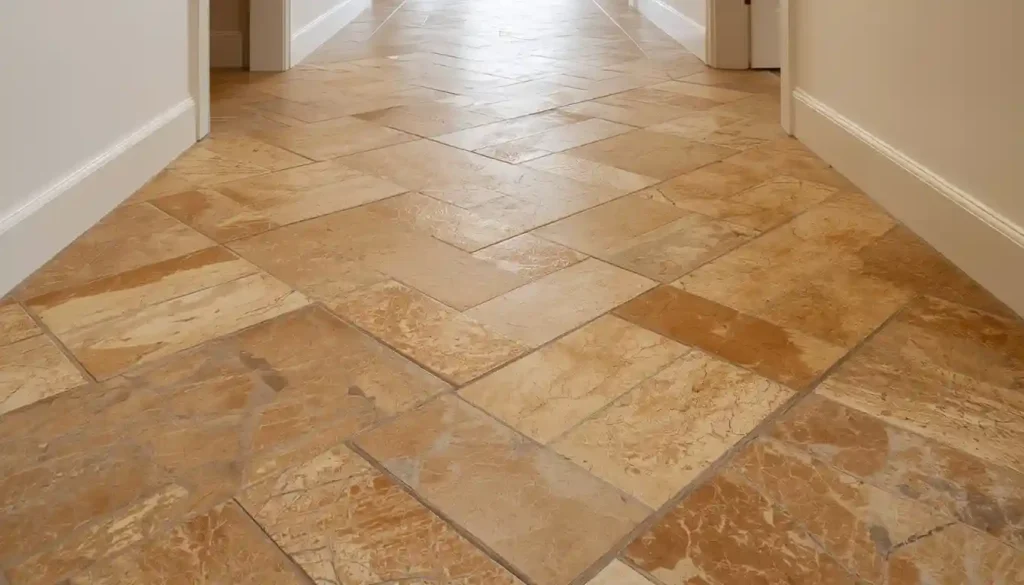
Natural stone in a herringbone pattern is one of the most enduring pairings in interior flooring design, and nowhere does it work better than in a hallway or entrance corridor. Stone has a physical presence — weight, depth, subtle variation — that no manufactured tile can fully replicate, and the herringbone pattern enhances those qualities by creating many more edges and joints across which light, shadow, and color shift. Limestone, travertine, and tumbled marble all perform well in this application, each with a different character.
Limestone herringbone tends toward calm and neutral — warm beige to grey-buff tones with a honed or brushed finish that is non-slip underfoot and ages beautifully with traffic. Travertine carries more organic variation, with its characteristic pitted surface and fossil-like inclusions that give each tile a distinct personality. Tumbled marble sits between the two: the tumbling process rounds the edges and creates a slightly irregular surface that reads as genuinely antique, which makes it particularly effective in older homes or renovations trying to reference historical architecture.
The key technical consideration with natural stone in a herringbone hallway is sealing. Sealing tile flooring before grouting and again after grouting is essential with porous stones like travertine and limestone — without it, grout stains the tile surface during installation and is nearly impossible to remove. After installation, a penetrating sealer applied annually will maintain stain resistance without altering the stone’s natural surface appearance.
Idea 8: Monochrome Black-and-White Herringbone for a Utility Room or Mudroom
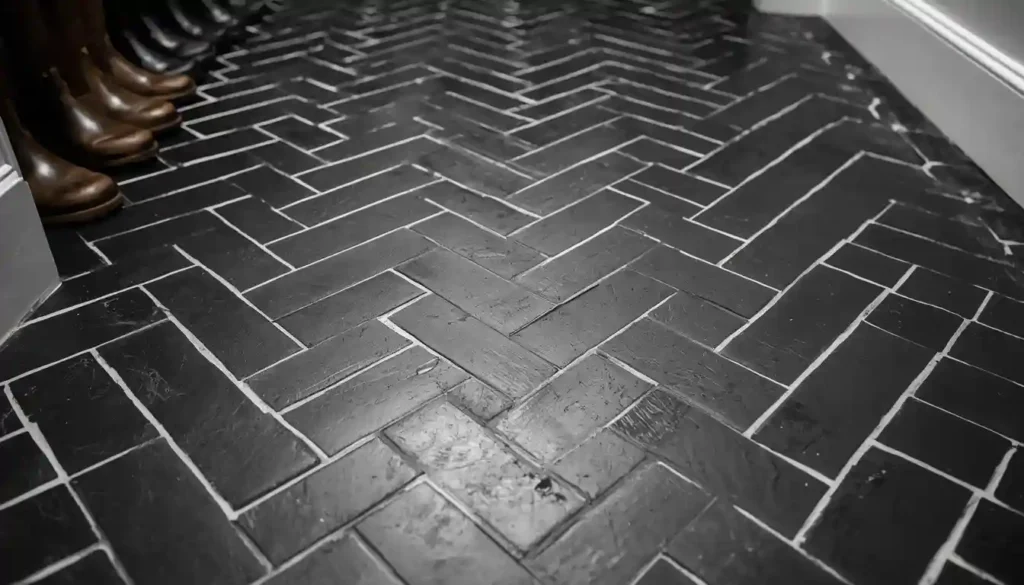
The monochrome palette — black tile, white grout, or white tile, dark grout — applied to a herringbone layout creates one of the most graphic and declarative floor patterns available in residential design. In a utility room, laundry room, or mudroom, where the space has a functional job to do and the design budget rarely extends to the materials used in primary living spaces, a monochrome herringbone is a high-impact choice that costs no more than a plain tile floor but delivers an entirely different quality of space.
Smaller tiles — 2×4 inch ceramic or porcelain in black with bright white grout — produce a dense, intricate pattern that looks elaborate without actually requiring expensive materials. The graphic nature of the contrast means the floor does most of the decorative work: you need little else on the walls or in the fixtures to make the room feel resolved and intentional. White shiplap walls, a black utility sink, and simple open shelving are all that is needed to complete a room that feels like it was designed rather than simply assembled.
For mudrooms specifically, the dark tile is practical: it hides dirt, mud, and the general evidence of a heavily used space far better than lighter alternatives. The herringbone layout also means that any chips or damage to individual tiles are harder to spot than they would be in a straight grid, because the eye is too busy following the pattern to notice minor imperfections. This is a meaningful advantage in a space where heavy boots, wet umbrellas, and pet paws are daily realities. Combining this with the right entrance floor strategy means also thinking about how tile flooring patterns affect the mood and function of transitional spaces like these.
Idea 9: Wide-Plank Wood-Look Herringbone for an Open-Plan Living and Dining Space
Open-plan spaces present a specific flooring challenge: the floor must work as a continuous surface across a kitchen, dining area, and living zone, often with different functional requirements in each zone. Hardwood and engineered wood flooring handle this beautifully but at considerable cost and with maintenance sensitivities, particularly near kitchen areas where water and oil are constant presences. Wide-plank wood-look porcelain in a herringbone layout is the resolved answer to this challenge — it delivers the warmth and continuity of real wood across a large open plan while handling the reality of how those spaces are used.
The plank dimensions matter specifically in this application. Using 6×36 or even 8×32 inch tiles creates a pattern that reads as bold and considered at the scale of a large room — smaller tiles in an open plan can feel fussy and restless when repeated over 400 or 500 square feet. A medium-toned oak or ash look in a matte finish is the most universally successful choice because it is warm without being busy, natural without being literal, and works with a very wide range of cabinet finishes, wall colors, and furniture styles.
The herringbone pattern in this context also solves a subtle spatial problem in open-plan rooms: it provides the floor with its own internal structure and hierarchy without requiring area rugs or other zone-defining devices. The V of the herringbone pattern, when centered on the room’s primary axis, creates a gravitational center that organizes the space visually even without physical barriers between zones. This is meaningful in rooms where the goal is visual continuity while still reading clearly as multiple functional areas. Understanding the relationship between subfloor preparation and the final result is also important — the quality of your subfloor for tile flooring directly affects how flat and tight the herringbone pattern can be installed.
Idea 10: Zellige-Style Glazed Herringbone as a Kitchen Backsplash
While most of the ideas in this article focus on floor applications, herringbone tile works with exceptional effectiveness as a kitchen backsplash — and the Zellige-style glazed tile is its most dramatic expression in this context. Zellige tiles are handmade Moroccan clay tiles with a thick, irregular glaze that fractures light differently across each tile face, producing a surface that shimmers and shifts as you move through the kitchen or as light conditions change throughout the day. The imperfections are the point: slight variations in tile thickness, glaze color, and surface flatness mean that no two tiles are identical.
In a herringbone layout on a kitchen backsplash, these variations compound across the surface into something genuinely extraordinary. Each joint catches light differently, each tile face reflects it differently, and the overall effect is of a surface that is alive rather than static. Common colors include warm whites, pale greens, sandy taupes, and dusty blues — any of which can serve as a connecting thread between cabinetry color and countertop material. Behind a range, framed by cabinetry on both sides, a Zellige herringbone backsplash becomes a piece of art that also functions as a surface you cook in front of daily.
The practical consideration is that Zellige tiles require slightly wider grout joints than precision-cut porcelain because of their dimensional variation — typically 1/8 to 3/16 inch. The grout color should be warm and tile-adjacent rather than sharply contrasting, because the surface already has more than enough visual interest without the added layer of contrasting lines across it. Installation is labor-intensive and should be done by a professional familiar with handmade tile to ensure the surface is as level as possible given the material’s inherent irregularity. For anyone interested in how tile compares to other kitchen flooring and surface options in terms of durability and performance, tile flooring versus vinyl remains one of the most relevant practical comparisons.
Idea 11: Herringbone Tile Flooring with Contrasting Border
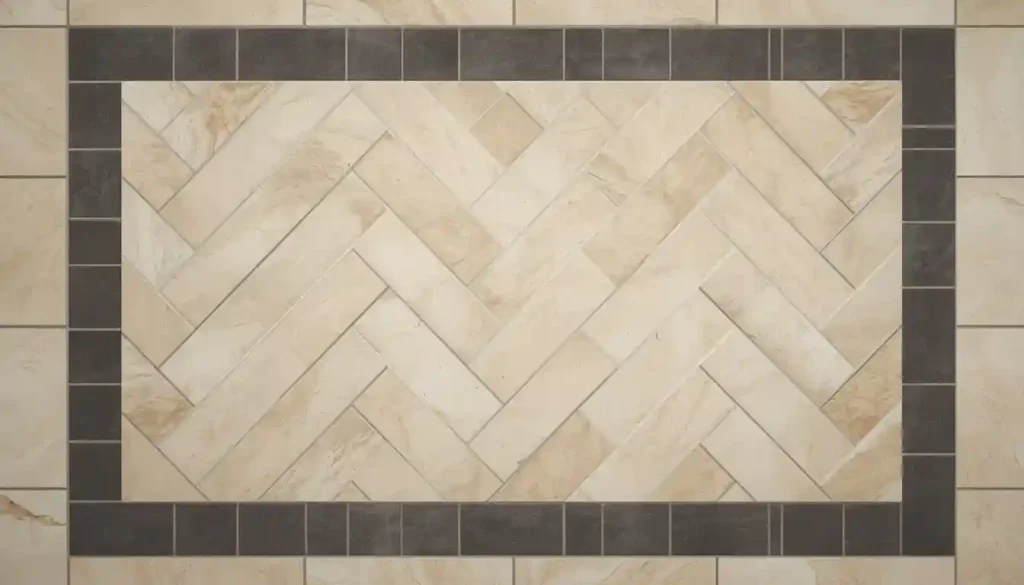
A bordered herringbone floor is one of the oldest and most classical approaches to tile design, with roots in Roman, Baroque, and Georgian architecture. The principle is straightforward: the herringbone pattern fills the main body of the floor while a contrasting tile — a different color, material, or format — runs as a border around the room’s perimeter. This framing device transforms the floor from a surface into a composition, giving it a finished, intentional quality that unbordered floors rarely achieve.
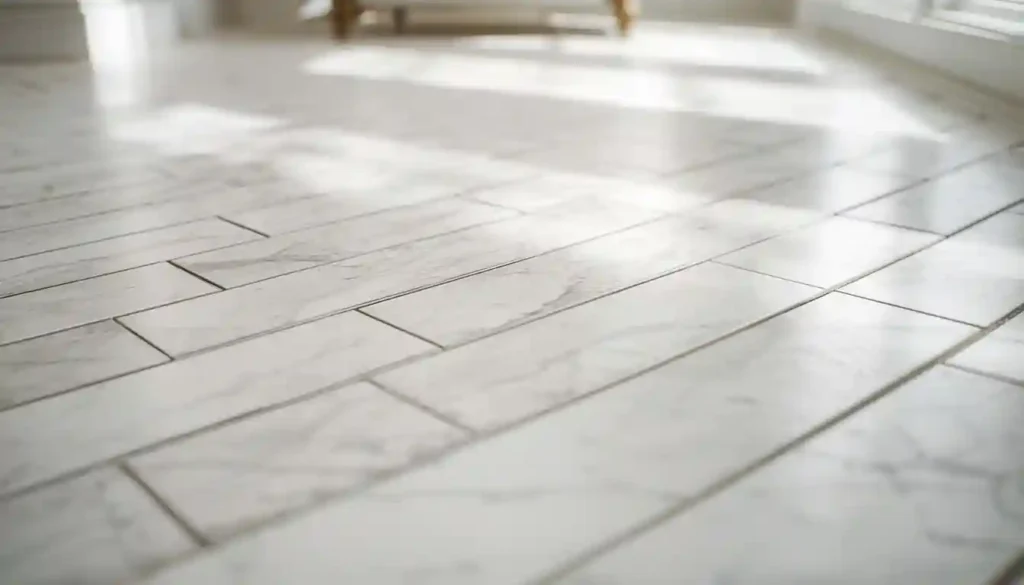
The most effective contemporary version of this idea uses restraint in the contrast. Rather than a bold dark border against a light herringbone center — which can feel rigid and formal — a subtler pairing works better in most homes: a warm cream herringbone in the field with a single row of charcoal tiles as a border, for instance. Or a grey herringbone body with a thin row of white marble border tiles. The border defines the floor’s edges without competing with the pattern for attention. In rooms with complex shapes, the border also solves the visual problem of irregular cuts at the perimeter by providing a defined edge at which the herringbone stops cleanly.
This approach works particularly well in foyers, formal dining rooms, and bathroom floors — any space where the architectural quality of the floor is a deliberate part of the room’s character. In a bathroom especially, a white marble herringbone field with a simple dark pencil-tile border elevates the entire room into something that feels far more considered than the budget or footprint would suggest possible. Keep the grout consistent between field and border for visual unity, and ensure the border is installed first so it establishes the frame into which the herringbone pattern fits precisely. When researching installation approaches, understanding how to lay tile flooring patterns with care for alignment and layout is essential for achieving this kind of precise, architectural result.
Choosing the Right Tile Size for Your Herringbone Pattern
Tile size is the single variable with the largest impact on how a herringbone pattern reads in a finished room. Understanding the relationship between tile dimensions and visual output helps you make a decision that is matched to both the room’s scale and your intended aesthetic.
Small tiles — in the 1×3 to 2×6 inch range — create a dense, intricate pattern with many grout lines per square foot. In bathroom floors, shower walls, and backsplashes, this density reads as decorative and crafted — more detail, more visual texture, a surface that rewards close inspection. In large rooms, the same tile size becomes overwhelming because the density of joints across hundreds of square feet creates visual noise rather than visual interest. Small tiles belong in small applications.
Medium tiles — 3×6 to 4×12 inches — are the most versatile. They work on bathroom floors, kitchen floors, entryways, and feature walls without feeling either too busy or too sparse. The standard 3×6 subway tile in a herringbone pattern is essentially the default medium-format choice, recognizable enough to feel resolved and proportional in a wide range of spaces. For most residential applications, this is the size that performs most reliably across different rooms and design styles.
Large-format tiles — 4×24 and above — are the contemporary choice. The pattern is bolder, the grout line count is lower, and the overall effect is more architectural than decorative. These work best in large open-plan areas, wide hallways, and anywhere you want the herringbone pattern to feel like a design gesture rather than a decorative texture. They require a flatter, better-prepared substrate because minor undulations in the floor surface become more visible across a larger tile face. For both tile flooring and subfloor preparation principles, the underlying surface quality determines whether large-format tile installations succeed or struggle.
Grout Color: How It Changes Everything
Grout color is the most underestimated decision in a herringbone tile installation. The same tile looks like a fundamentally different floor depending on whether the grout matches the tile, complements it, or contrasts with it sharply. Understanding what each approach does visually helps avoid regret.
Matching grout — where the grout color is chosen to be as close as possible to the tile — creates a monolithic effect. The herringbone geometry is still visible through the shadow of the joint lines, but it is subtle rather than emphatic. This is the right choice when you want the tile’s surface color and texture to be the primary statement, and you want the floor to read as a unified surface rather than a pattern of individual tiles. It works particularly well with marble-look tile and large-format plank formats where the tile face itself has enough visual interest.
Contrasting grout — white grout with dark tile, dark grout with light tile — amplifies the geometric quality of the herringbone to its maximum. The pattern becomes explicitly graphic. This works brilliantly in small doses — a mudroom, an entryway, a bathroom floor — where the floor is a contained feature and the bold geometry is intentionally the room’s most memorable element. In larger spaces, high-contrast grout can become visually exhausting because every square foot of floor is competing equally for attention.
The middle path — a grout that is two or three shades darker than the tile — creates the most balanced result in most applications. It defines the pattern clearly enough that the herringbone geometry reads well without overwhelming the surface. For natural stone especially, a slightly warm mid-toned grout blends with the tile’s organic variation while still providing enough definition to read as a considered pattern rather than an incidental arrangement of rectangles. For those also comparing other flooring materials in terms of how patterns and finishes interact with room design, tile flooring versus hardwood offers a useful frame of reference for evaluating both aesthetic and practical tradeoffs.
Installation Direction: How Orientation Changes the Room
The direction in which a herringbone pattern is laid — the axis along which the V-shapes point — is a design decision with measurable spatial consequences. It is worth making intentionally rather than defaulting to whatever the installer defaults to.
Running the herringbone along the room’s longest dimension — so the V points toward the far wall — draws the eye in that direction and lengthens the perceived space. This is the right choice in most narrow rooms: corridors, galley kitchens, elongated bathrooms. The floor’s directional rhythm reinforces the room’s natural axis and makes the space feel larger along its longest dimension.
Running the herringbone across the room’s width — V pointing toward the side walls — works in wide rooms where the goal is to create a sense of breadth and openness rather than depth. In a square room, neither direction dominates, and the choice becomes purely aesthetic — point the V toward the room’s focal point (a fireplace, a view, a feature wall) to use the floor’s built-in directionality to reinforce the room’s hierarchy.
Diagonal herringbone — where the entire pattern is rotated 45 degrees relative to the room’s walls — creates the most dynamic and movement-filled variant. It adds energy to static rooms, works well in large open plans, and creates an especially dramatic effect in entryways where the floor is the first surface encountered. It is also the most demanding to install, requiring more cuts at the perimeter and a higher skill level from the installer to execute cleanly.
Why Herringbone Tile Holds Its Value
One of the less-discussed aspects of herringbone tile flooring is its relationship to resale value. Unlike trend-driven materials and finishes that can date a home within five to ten years, the herringbone pattern has been in continuous use for over two thousand years. That longevity means it reads as timeless rather than fashionable — it signals quality and craftsmanship without associating the home with a particular design moment. Buyers recognize the pattern as a mark of considered design investment rather than a style decision that will need reversing.
Porcelain tile specifically — the material that performs best in herringbone applications for most homeowners — adds durable, low-maintenance flooring that buyers value for its practical qualities as much as its appearance. It does not require refinishing the way hardwood does, does not need replacement the way carpet does, and handles the wear of daily life without visible degradation over the timescales that matter for resale. A well-installed herringbone porcelain tile floor in a kitchen or bathroom is as close to a permanent, value-positive improvement as residential flooring decisions get. Understanding the full range of what makes tile flooring a lasting investment also connects to understanding the complete pros and cons of tile flooring as a material category.
The eleven ideas in this article represent the full range of what herringbone tile flooring can be — from the quietly sophisticated to the overtly dramatic, from small bathroom floors to large open-plan living spaces, from natural materials with centuries of history to contemporary formats using the latest porcelain manufacturing. What all eleven share is a commitment to a pattern that earns its place on the floor every time it is laid correctly, in the right material, at the right scale, with the right grout. That combination — which is ultimately a collection of decisions rather than a single product — is what separates a herringbone floor that looks like an inspired design decision from one that simply fills a space.


